Tuesday, January 31, 2012

Grab 'N' Go Canned Soup... Part 1 Hamburger Vegetable Soup

While searching for a can of soup in my pantry at the last minute before running out the door, late for work with no leftovers from the night before, and finding nothing to my liking... the idea popped into my head... why don't I can up some GOOD soup, with ingredients I recognize, and meat that I know is real meat and not pressed pieces and parts that are barely recognizable as meat...

The idea progressed... I could can the soup in wide mouth pint jars... reheat at work IN THE JAR, and eat. How easy would that be? *Head Slap* Why had I not thought of this before??? So I did it...

First soup... Hamburger Vegetable...

Here's what I did...


I browned a pound of ground beef and drained it well...


I diced a couple (2-3) potatoes and added them...


...I added a couple diced carrots...


... and a chopped onion...


I like a little something green in my vegetable soup, so I added some fresh green beans I had on hand (if you add green beans, use fresh or frozen, not previously canned, the pressure canning will cook them to pieces if you use previously canned)... you could add peas in place of the green beans, or leave them out entirely if you wish, personal choice...


I added some frozen whole kernel corn (again, personal choice, corn is optional, but tasty!)


I poured a big bottle of vegetable juice cocktail over the meat and veggies (V-8)... you could use just tomato juice, but I love the flavors of the vegetable juice cocktail.


I seasoned my soup with some garlic powder (maybe a teaspoon), and salt and pepper.


Then I brought the mixture to a boil over medium high heat. (if I wasn't gonna can this, I'd then reduce the heat and let it simmer until the veggies were soft and the flavors married)... but for canning, just bring it to a boil to heat things through... the canner will soften things up.


While the soup was heating, I heated my wide mouth pint jars in boiling water and simmered my lids in boiling water and kept everything hot until I was ready for them.

I ladled the soup into the jars, leaving a good half inch headspace. I tightened the hot lids on to fingertip tightness. 

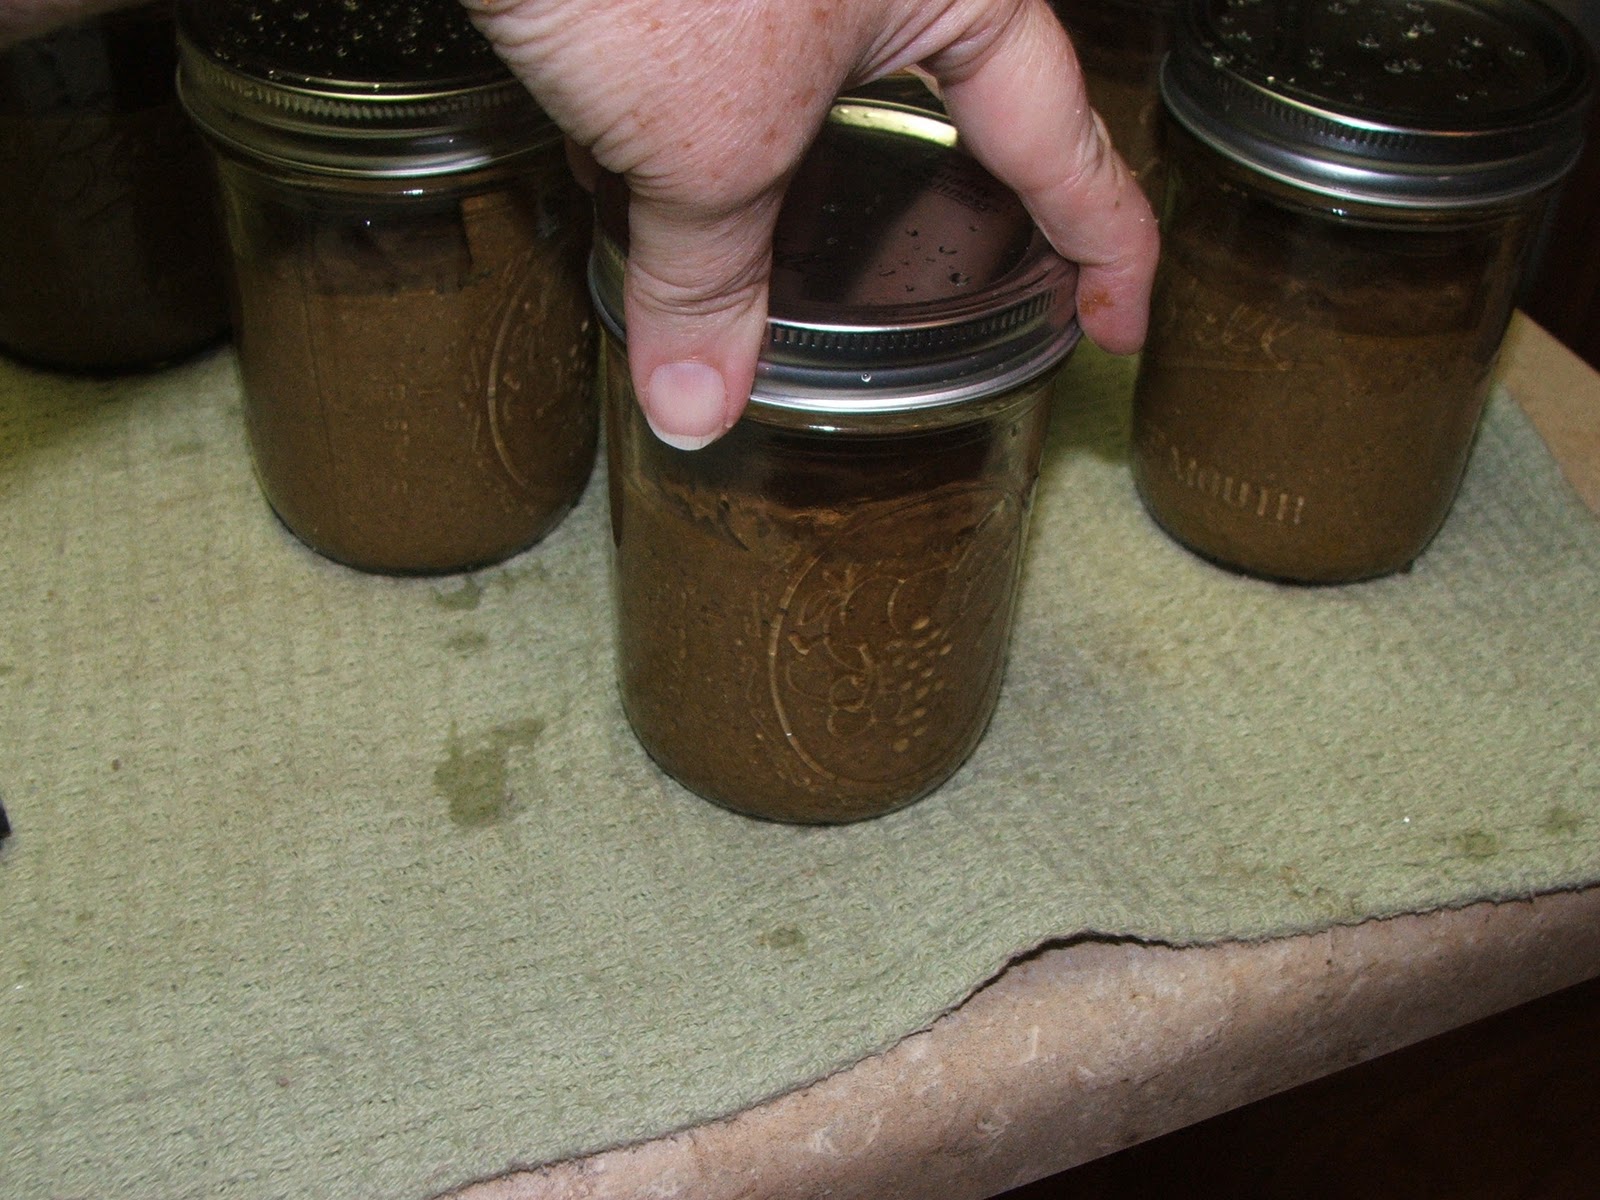
I place the jars in my pressure canner and processed them at 10 pounds of pressure for 70 minutes (quarts would take 90 minutes)... after the processing was complete, I removed the canner from the heat and let the pressure drop to ZERO before removing the lid and removing the jars using my jar lifter and setting them on a folded dish towel on the counter to cool and seal...

... That PING of each successfully sealed jar is music to my ears!


Yummy soup to Grab 'n' Go! This recipe made about 7-8 pints of delicious hamburger vegetable soup.

If you're someone who forgets to order food online through a Medifast retailer or a different diet plan similiar to Medifast, you know what it's like to not have food around the house so having several jars of soup like this could really come in handy if you're ever busy or be a life saver if you're having company!

For a printable copy of the recipe, click here.

Canning Granny©2012 All Rights Reserved

Monday, January 23, 2012

2,000 "Likes" Facebook Give Away


I said I was going to cook supper before I announced the give away, but I couldn't wait! I am so grateful to all my Facebook Friends, your support, love, humor, and shared information are so wonderful... I want to just give you all a big hug! I am amazed and completely humbled by the outpouring of support you have shown and the fast rate that the Canning Granny Facebook page is growing... I'm pleasantly surprised every day. You folks make every day brighter. And I just want to do a little something to let you all know how appreciated you are...

Supper is on the stove... I have chicken stewing to make chicken and dumplings on this rainy, gloomy, chilly evening... yep, it's definitely a chicken and dumplings sort of evening!

The give away is this... a trio of hand crocheted dish cloths... made 'em myself using 100% cotton yarn... they should last and last and last... I have been using one I made earlier and I love the mesh ones... they clean the dishes so nicely, the mesh adds a little gentle scrubbiness... and then I hang it over the sink and it dries much more quickly than my old "store-boughten" dish cloths. 

I wanted to think of some fantastically creative way to do this give away... some sort of contest, or quiz, or something... but couldn't come up with anything... But, always up for a little foolishness and silliness, I decided...

And.... without further ado...

Here's what I would like for you folks to do if you are interested in owning these three dish cloths, a token of my extreme appreciation...

Every item should have more than one purpose, don't you think? And if you owned these dish cloths, I'm sure you would use them for their intended purpose... washing dishes...

But... can you think of another, maybe outlandish, silly, crazy, or foolish use for these dish cloths? In a comment below, along with your name (PLEASE include your name, last time I had a few Anonymous folks with no name and I had to throw those out, I do NOT want to have to do that!), include another purpose you might use these dish cloths for... the more outlandish and silly, the better... this is all in fun! I can't wait to read your creative and fun uses for the humble crocheted dish cloth ;-)

And, again, thank you from the bottom of my heart, for all your support!

We'll do a random drawing THIS Saturday morning... January 28!

~~Canning Granny


Tuesday, January 17, 2012

I Made Salami

I recently became intrigued with the idea of making my own cold cuts. I like knowing what's in my food and I like learning new things. So I Googled and I read, and I researched, and I found a fairly simple recipe for salami to start on in my new quest.

The recipe I found called for...

1 pound ground beef
1/4 teaspoon garlic powder
1/4 teaspoon onion powder
1/4 teaspoon crushed red pepper
1 Tablespoon curing salt
1 Tablespoon liquid smoke
3/4 cup water

I was concerned about the curing salt... I read and researched substitutes but there was little to be found, it seems to make a sausage you really need curing salt... which contains salt, sugar, and sodium nitrate, and sometimes a few other ingredients, depending on the brand. It was the nitrates that concerned me, I was going for an old time product, without dangerous chemicals. There were a few recipes out there that did NOT contain the nitrates, but not many, and if made in that way would yield a product that was not really a cured meat, would need to be refrigerated or frozen (which was fine with me), and would also be unattractive and gray instead of the pinkish brown we associate with salami. I went back and forth with myself, trying to decide. It was my first sausage... I decided to go exactly by the recipe... this time.

Also, in my reading and research, I found out that nitrates have been used in curing meats for years and years... I found many OLD, really old recipes that didn't call for curing salt, but did call for salt, sugar, and an ingredient I was not very familiar with... saltpeter... yup, the old ingredient in gunpowder... a LOT of old meat curing recipes call for saltpeter... Just what IS this old-fashioned ingredient? I asked. 

Back to Google!! Lo, and behold, saltpeter is a nitrate! Either potassium nitrate or sodium nitrate... both go by the handle saltpeter.

Anyway... here's what I did...


First, I put my ground beef into a big stainless steel bowl. I had a package of 4 pounds of ground beef, so I multiplied my recipe 4X.


I assembled the rest of my ingredients. I found the curing salt at my local sportsman's store in the meat and game curing section. My local grocery store did not have it, or at least I couldn't find it... I've read some supermarkets carry it, but mine does not.


I added all the ingredients to the ground beef in the stainless steel bowl, adding the water last...


Then I mixed it all up with my hands (I assure you, my hands were well-washed and very clean)... it's important to mix well, for like 5 minutes, so you don't get salty spots... you want everything incorporated very very well.


Once my ingredients were well mixed, it was time to shape my mixture into cylinders. I made 4 cylinders with the meat mixture, wrapping each tightly in aluminum foil.


Then you let them sit... in the refrigerator, to allow the ingredients to mingle and marry... 24-48 hours... so I waited... once in awhile I opened the fridge and looked at my aluminum foil wrapped cylinders, but really they would have been fine if I hadn't checked on them... they just needed to sit there and marinate, mingle, and marry. They didn't need me at all during that 24-48 hours.


Once the mingle time was up (I think I let mine go for about 36 hours, I couldn't wait any longer!)... I took the cylinders out of the fridge. I preheated my oven to 325 degrees for a good 15 minutes... then I poked some holes in the foil so the juices could drip out of the salami as it cooked.

I placed it on a wire rack in a deep baking pan to keep it up and out of the drippings... it needed to cook until no more juices flowed out.


I placed my row of cylinders of salami into the oven and cooked it for 1 hour 45 minutes, checking on it occasionally. After the time was up, I removed it from the oven and unrolled the foil... it was still a little juicy, so I reduced the oven temperature to 170 degrees and set them back in to dry just a bit more. (I left them in the warm oven for maybe another 45 minutes while I cooked dinner, spaghetti and salad, by the way)


Once the salamis were nice and dehumidified (not sure that's the technical term here, but there was no more juice running out), I allowed them to cool to room temperature before slicing.


They sliced up nicely, with a rich pink/brown color and all those flecks of red pepper flakes... I was so proud!


I vacuum sealed the slices using my Food Saver and stored some in the refrigerator, and put some in the freezer (not because I HAVE to, but because it's convenient for me).

The taste test revealed a delicious salami!

I do think next time (and there WILL be a next time!) I will spice it up a little more, maybe a little more pepper flakes, and maybe some peppercorns. We'll see. Mr. G says they'd be fantastic with some sharp cheddar cheese and some pickles or olives. Yum! And maybe I'll try this recipe without the curing salt some time... I'd just mix half sugar, half salt, and leave out the nitrate... just to see if I could do it successfully.


Sunday, January 15, 2012

Canning Boston Brown Bread

*Disclaimer... before you read any further, please be warned that the USDA and the FDA do NOT approve of canning cakes and breads. Rest assured I AM aware of this. Continue at your own risk...

I started with the following recipe from simplyrecipes.com


Boston Brown Bread

Do your best to find the rye flour. It adds a lot to the flavor of the finished bread.

INGREDIENTS

  • Butter for greasing loaf pans or coffee cans
  • 1/2 cup (heaping) all-purpose flour
  • 1/2 cup (heaping) rye flour
  • 1/2 cup (heaping) finely ground corn meal (must be finely ground)
  • 1/2 teaspoon baking powder
  • 1/2 teaspoon baking soda
  • 1/2 teaspoon salt
  • 1/2 teaspoon allspice
  • 1/2 cup molasses (any kind)
  • 1 cup buttermilk
  • 1 teaspoon vanilla extract (optional)
  • 1/2 cup raisins (optional)
  • One metal 6-inch tall by 4-inch diameter coffee can, or a 4x8 loaf pan

METHOD

1 You can either make this in the oven or the stovetop, and you can either make this with a loaf pan or a metal coffee can. If you are using the oven method, preheat the oven to 325° and bring a large pot of water to a boil. If you are using the stovetop method, set the steamer rack inside a tall stockpot and fill the pot with enough water to come 1/3 of the way up the sides of your coffee can. Turn the burner on to medium as you work.
2 Grease a coffee can or small loaf pan with butter. In a large bowl, mix the all-purpose flour, rye flour, corn meal, baking powder and soda, salt and allspice. Add the raisins if using.
3 In another bowl, mix together the buttermilk and vanilla extract if using. Whisk in the molasses. Pour the wet ingredients into the dry and stir well with a spoon.
4 Pour the batter into the coffee can or loaf pan taking care that the batter not reach higher than 2/3 up the sides of the container.
5 Cover the loaf pan or coffee can tightly with foil. If you are using the stovetop method, set the can in the pot, cover and turn the heat to high. If you are using the oven method, find a high-sided roasting pan that can hold the coffee can or loaf pan. Pour the boiling water into the roasting pan until it reaches one third up the side of the coffee can or loaf pan. Put the roasting pan into the oven. Steam the bread for at least 2 hours and 15 minutes. Check to see if the bread is done by inserting a toothpick into it. If the toothpick comes out clean, you're ready. If not, recover the pan and cook for up to another 45 minutes.
6 Remove from the oven and let cool for 10 minutes before putting on a rack. Let the bread cool for 1 hour before turning out of the container.
7 Slice and eat plain, or toast in a little butter in a frying pan.
Yield: Serves 4-6.

Here's what I did...

I began my "subversive" bread canning project by heating my wide mouth pint canning jars in the oven at 250 degrees for 20 minutes. I put enough water into my canner (or a large stockpot with a lid, used my canner because it's the only pot I have big enough) to cover the jars to about 1/3 of the way up the sides of the jars. I turned the heat on medium to get it going while I began mixing my batter.


I sprayed the insides of the jars with cooking spray (could have buttered them, but the spray was easier)


Next, I gathered my ingredients... I multiplied the original recipe by 4x so I could fill 8 pint canning jars.

I mixed all my dry ingredients in one large mixing bowl...


Then mixed all my liquid ingredients in another bowl (I chose NOT to add raisins)


I mixed the liquid ingredients into the dry ingredients


I filled each of the greased jars about 2/3 full of the bread batter (allowing space for the bread to rise)


I took great care to wipe the jar rims to remove any excess batter and any oil from the cooking spray... 
TIP: a little vinegar on the cloth helps to remove grease and oil.


After simmering my lids in boiling water, I tightened the lids onto the jars to a fingertip tightness.


I placed the jars of bread batter into the simmering water in the big pot (canner)


I placed the lid onto the canner loosely (don't tighten it down) and kept the water at a low boil (you might need to adjust the heat occasionally, but keep it at a low boil, this is a steamed bread). I steamed my bread for 2 hours and 15 minutes.


After steaming, I removed the jars of bread using my jar lifter, and set them on a folded dish towel on the counter to cool, and to seal... didn't take long before I began hearing that PING of the jars sealing.


Next morning, I HAD to test the delicious looking (and smelling) bread. I popped open a jar...


I ran a butter knife between the inside of the jar and the bread...


... and it slid right out onto the plate... looking very yummy and cute... a miniature loaf of Boston Brown Bread.


I sliced it up...

...and spread it with some real butter... and enjoyed it with my morning coffee! Delicious!

*As I previously stated, this is NOT an approved canning method. I sterilize EVERYTHING and take great care to assure I use the cleanest utensils, jars, lids, bowls, pots and pans I possibly can. I have eaten "canned cakes and breads" up to a year or more after "canning" with delicious, moist results... I cannot stress enough that this is NOT an approved method... I choose to do it because I feel I use AT LEAST as clean and sterile methods as commercial companies (probably more so) and I'm a bit of a Rebel Granny... if you have ANY doubts... don't do it!

Tuesday, January 3, 2012

Canning Oranges... and other Citrus


The Christmas season, to me, always includes oranges... the bright, citrus aroma is just one of the smells that says Christmas to me...

There's just the two of us in this household now, but I can't help myself, I MUST have oranges in the house around Christmas... when the kids were home I didn't have one bit of trouble going through a bag of oranges, tangerines, or clementines... but now with just Mr. Granny and myself, it takes a little longer... but I still buy them...

And there they sat, in that fruit bowl, starting to dry out a little around the edges... something had to be done... can't waste all that citrusy goodness... so I decided to can them...

Here's what I did...


First, I peeled them, and segmented them (I had a couple lemons in that bowl too, so I added them to the mix)


The most labor intensive part of citrus is removing all the pithy white part... it's tasteless, tough, and unnecessary... so I carefully removed as much of the white part as I possibly could. And it's pretty important to remove any seeds unless you don't mind coming across a seed or two when you're eating them later.


For oranges, which are quite sweet on their own, a syrup is not entirely necessary, but I did have those few lemons, so I chose to mix up an ultra light syrup (1/2 cup sugar to 5 cups water)... orange juice could be used for the liquid, or just plain old water.


I brought the sugar/water mixture to a boil, ensuring all the sugar was dissolved.


After boiling my jars to sterilize them, I put my orange segments into the jars, fairly loosely packed and leaving a good half inch headspace.


I ladled the hot syrup into the jars.


Then ran a butter knife between the inside of the jar and the fruit to remove any air bubbles... then added more syrup to the jar if necessary.


I wiped the rims of the jars with a damp cloth...


And, using my handy dandy magnetic wand, removed the lids from the simmering water I had placed them in earlier...


...and tightened them onto the pint canning jars to a fingertip tightness.


I processed the jars of oranges in a boiling water bath (place the jars in a canner or large pot, ensuring they are completely covered with water, then bring to a boil and start timing) for ten minutes.

After processing, I removed the hot jars using my jar lifter and set them on a folded dish towel on the counter to cool, and to listen for the PING of each successfully sealed jar. (LOVE that sound!)


I enjoyed canning the few oranges I had left over from Christmas so much, the next day I made a trip to the grocery store and bought another big bag of oranges, a bag of clementines, and a huge bag of grapefruit to put up some more!


While I was preparing the grapefruit for canning, I decided to use the peel for a couple things... like dehydrating some for using later in recipes... once these are dry, I'll give them a whirl in the blender and store them in a jar for use in cakes, cookies, and even some pork or chicken dishes.


I put some of the grapefruit peels into a pint jar and filled it up with vodka to make grapefruit extract... I've done lemon, orange, peppermint, and vanilla extract before... why not grapefruit!?

Side story... I am a good Baptist girl from the South... we don't drink! And we sure don't speak to each other in the liquor store (LOL!)... Mr. Granny, however, is a good Episcopalian (aka "Whiskypalian)... and he has no problem with speaking to folks in the liquor store (it's a running joke between the two of us, just a bit of fun, folks, don't get your panties in a wad!)...

One day a few months ago we were on the side of town where we seldom go, at Northern Tools picking up some things... there's a discount beverage store on that side of town... as we left Northern Tools, I asked Mr. Granny, "Do you mind if we stop at the liquor store while we're over here?" I thought the man was gonna fall out of the car he was so surprised! "Well, SURE!" says he. I laughed till tears ran down my face at his reaction... I needed vodka for making extract... really I did... really...


Aren't these jars of canned grapefruit so pretty? When I canned them, I used a light syrup instead of ultra light... 2-1/4 cups sugar to 5-1/4 cups water... same process otherwise as the oranges.


html, body, div, span, applet, object, iframe, h1, h2, h3, h4, h5, h6, p, blockquote, pre, a, abbr, acronym, address, big, cite, code, del, dfn, em, font, img, ins, kbd, q, s, samp, small, strike, strong, sub, sup, tt, var, b, u, i, center, dl, dt, dd, ol, ul, li, fieldset, form, label, legend, table, caption, tbody, tfoot, thead, tr, th, td { margin: 0; padding: 0; border: 0; outline: 0; font-size: 100%; vertical-align: baseline; background: transparent; } body { line-height: 1; } ol, ul { list-style: none; } blockquote, q { quotes: none; } /* remember to define focus styles! */ :focus { outline: 0; } /* remember to highlight inserts somehow! */ ins { text-decoration: none; } del { text-decoration: line-through; } /* tables still need 'cellspacing="0"' in the markup */ table { border-collapse: collapse; border-spacing: 0; }