Sunday, November 18, 2012

Canning Ground Beef in Broth


Having jars of canned ground beef can be very handy on a busy day... or if you forgot to thaw out anything for dinner...

Open a jar, add to spaghetti sauce, season for tacos, add some beans and spices for a quick pot of chili, make a brown gravy, add spices and top with mashed potatoes for Shepherd's pie... the possibilities are endless...

Here's how I canned ground beef in broth...

I canned my ground beef in pint jars... rule of thumb one pint=one pound (more or less)... so pints are a good size for when your recipe starts out with "brown one pound of ground beef..."

I buy ground beef whenever I find it on sale... or it would be great if you raise (or buy) your own beef and don't have the freezer space to store it.

I started out by browning my ground beef...


I then drained the meat...


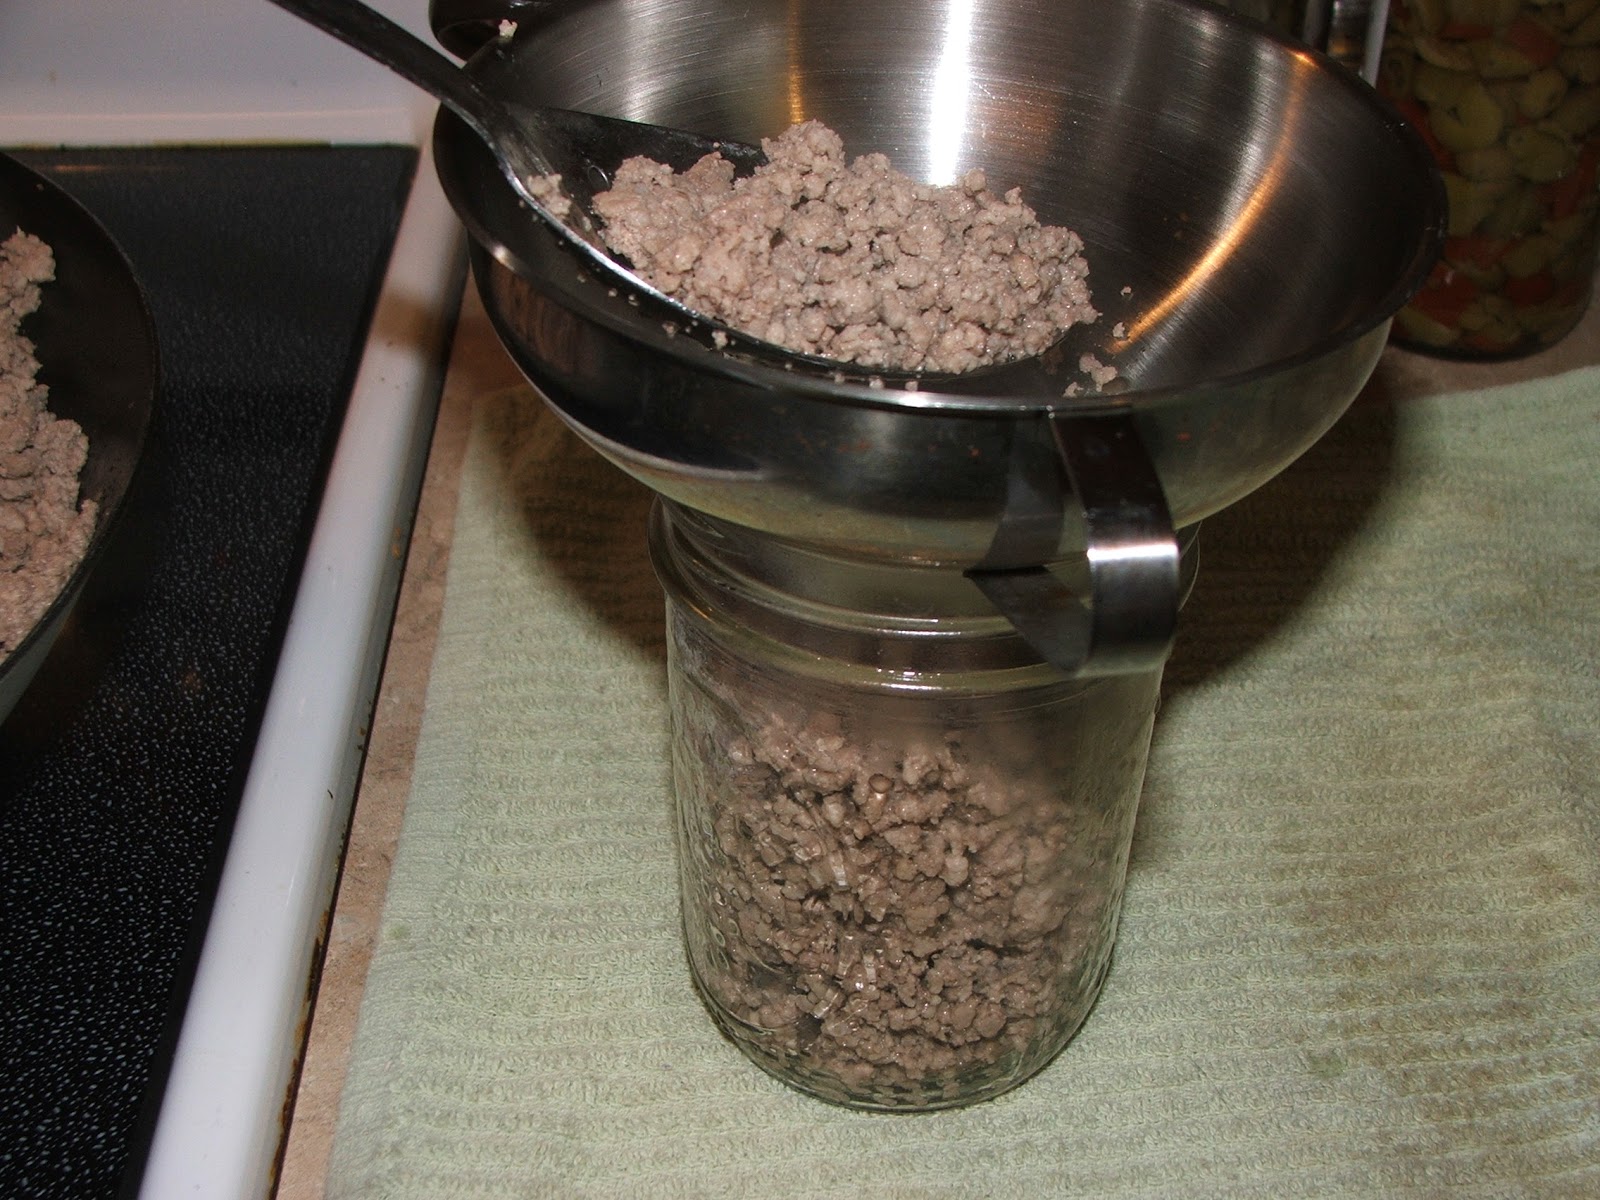
...and filled the hot, sterilized pint jars loosely, leaving a generous one inch headspace.


Next, I filled the jars with hot beef broth (make your own, buy it from the store, or use beef broth granules and mix with boiling water)... I left a one inch headspace... got rid of any air bubbles by inserting a plastic knife between the inside of the jar and the meat, adjusting headspace as necessary by adding more broth if needed.

After wiping the jar rims with a cloth dampened with a little vinegar to cut any greasiness, I tightened my hot, sterilized lids on to fingertip tightness.

I processed the pint jars in my pressure canner at 10-11 pounds pressure for 75 minutes (quarts would be processed for 90 minutes).

After processing, I let the pressure drop in my canner slowly, on its own... then waited an additional 10 minutes or so (the slow "cool down" helps prevent liquid loss and jar breakage) then removed the jars using my jar lifter...

And set them on a folded dish towel on the counter to cool (away from any drafts) and to listen for the PING! of each successfully sealed jar.


Homemade convenience food... doesn't get any better!

Friday, November 9, 2012

Let's Write a Book


A few weeks ago I received an email from a dear lady, Ruth, who works for a small publishing company, asking if I was interested in publishing a "Canning Granny" Cookbook. I put out a small "feeler" question on Facebook to see what you folks thought... would you buy it? what would you like to see in it? etc.

Combining your wonderful feedback, my own ideas, and Ruth's suggestions... here's what we've come up with... it's still an idea... nothing's been signed... yet.

Reader's ideas and suggestions...

• Full color, step by step... like the blog
• Not too expensive
• Something different, not just a re-hash of the Ball Book and other canning books
• E-book as well as hard copy
• Recipes submitted by readers and Facebook followers with the contributor's name and state listed with the recipe (LOVE this idea!)


So, here's the concept...

I'd like to publish a Canning Granny (and friends!) Cookbook including recipes submitted by readers as well as my own recipes...

There are TONS of canning books out there with jams and jellies, pickles, fruits and veggies... so, trying NOT to just be a re-hash of those...

This book will be "Meals in Jars"... recipes for canning meals that are full meals or would only need making rice or noodles or adding milk or cream to the product after opening... for busy days when you don't have time or feel like cooking a full meal... just open a jar, boil some noodles, and eat! Or for times (like the recent Hurricane Sandy) when you have limited means of cooking and need something tasty and nutritious that you can heat up fast and have a meal in minutes.

I plan to include in the book... basic canning processes briefly... maybe include frequent or unusual questions and answers... and a few anecdotes about me and my life scattered here and there, just for fun.

Whatcha think?

So... if you're interested in participating in this cookbook project, here's what I'd like for you to do...

Send me, via email, at canninggranny@gmail.com...

Your "Meal in a Jar" recipe(s), including your Name and the State you are from...

The recipes need to be your own creation (or a friend or family member's), so we don't copy recipes from other cookbooks... we want these recipes to be unique.

The recipes need to be "canning safe!" While I sometimes indulge in "outlaw canning," this collection will need to be "approved." No grains, no "unapproved" thickeners, no dairy, no noodles... nothing "questionable."

Ideas include soups, stews, casseroles, bean dishes, meat and chicken dishes...

Please include complete instructions as well as how much it makes (quarts, pints, etc.)

So... whatcha think?
Interested?

I think this will be fun (even though right now I feel just a little overwhelmed by the idea! YIKES!)

Again... my email address is canninggranny@gmail.com

Let's get started!


Sunday, November 4, 2012

Canning Mexican Chicken Soup


Mr. G always takes me to get Mexican Chicken Soup at the local Mexican Restaurant whenever I have a bad cold... it's such a comfort food. When reader Diana shared this soup with us on Facebook, my ears perked up... sure would be nice to have some of this delicious goodness on hand for those chilly days and winter colds.

The recipe is a little different than our local restaurant serves, but it's so yummy! The restaurant includes rice and doesn't have beans... and they add avocado and lime juice... When I opened a jar of this soup recently, I added some sliced avocado and a squeeze of lime... it's pretty close!

Here's what I did...

I cooked, de-boned, and shredded three chicken breasts (boneless, skinless would save a step here)

Then in my large stainless steel stockpot I combined the shredded chicken with

1-1/2 cups sliced carrots


2 cups sliced celery


2 cans Ro-Tel (tomatoes with peppers)


2 cans kidney beans (if you prefer dry, soak some overnight before adding)


4 cups peeled, chopped tomatoes
6 cups water
3 cups whole kernel corn (I used frozen, fresh or drained canned would work)


1 tsp. cumin


1 Tbsp. canning salt
3 cloves minced garlic
3 bouillon cubes

I brought the mixture to a boil over medium high heat, reduced the heat and simmered for 5-10 minutes.

Meanwhile... I washed and sterilized 7 quart canning jars and put my lids in hot water to simmer.

I ladled the hot soup into the hot jars leaving an inch headspace, wiped the jar rims with a damp cloth, and tightened on my hot lids to fingertip tightness.

I processed the jars of soup in my pressure canner at 10 pounds pressure for 90 minutes (if you choose to do them in pints, process for 75 minutes)

After processing, I allowed the pressure in my canner to drop to zero on its own (don't hurry it or you might get liquid loss)... then opened it up and removed the jars using my jar lifter and set them on a folded dish towel on the counter to cool... and to listen for the PING of each successfully sealed jar!


Come on winter! We're ready!

For a printable copy of this recipe click here.

Thursday, November 1, 2012

Canning Sweet and Sour Chicken


When one of Canning Granny readers, Diana, shared the recipe for Sweet and Sour Chicken, I knew I had to try it...

Here's what I did...

I sterilized 5 quart canning jars.

I cooked and shredded 4-1/2 pounds of chicken breast

Drained 3-15 ounce cans of pineapple chunks, reserving the juice

Diced 2 green bell peppers, 1 red bell pepper, and 2 medium onions

I layered in the jars... chicken, onions, peppers, and pineapple chunks.


In my large stainless steel saucepan, I combined...

3 cups reserved pineapple juice
3/4 cup brown sugar
1-1/4 cups white vinegar
6 Tbsp. soy sauce
4 Tbsp. ketchup
1 tsp. ginger

I brought this mixture to a boil over medium high heat, stirring to dissolve the sugar.

Then poured the hot liquid into the jars, covering the layered ingredients, leaving a one inch headspace. I removed any air bubbles and adjusted the liquid as necessary.


I wiped the jar rims with a damp cloth, then tightened on my hot lids to fingertip tightness.


I processed the jars in my pressure canner at 10 pounds of pressure for 90 minutes. After processing, I allowed the pressure in my pressure canner to drop to zero naturally, then opened it and removed the jars using my jar lifter. I set the hot jars on a folded dish towel on the counter to cool... and to listen for the PING of each successfully sealed jar.


Several weeks after canning this "meal in a jar," I opened a jar for dinner, made a pot of rice and served it over the rice... SO YUMMY! Mr. G said it was Chinese Restaurant GOOD!

For a printable copy of this recipe, click here.
html, body, div, span, applet, object, iframe, h1, h2, h3, h4, h5, h6, p, blockquote, pre, a, abbr, acronym, address, big, cite, code, del, dfn, em, font, img, ins, kbd, q, s, samp, small, strike, strong, sub, sup, tt, var, b, u, i, center, dl, dt, dd, ol, ul, li, fieldset, form, label, legend, table, caption, tbody, tfoot, thead, tr, th, td { margin: 0; padding: 0; border: 0; outline: 0; font-size: 100%; vertical-align: baseline; background: transparent; } body { line-height: 1; } ol, ul { list-style: none; } blockquote, q { quotes: none; } /* remember to define focus styles! */ :focus { outline: 0; } /* remember to highlight inserts somehow! */ ins { text-decoration: none; } del { text-decoration: line-through; } /* tables still need 'cellspacing="0"' in the markup */ table { border-collapse: collapse; border-spacing: 0; }