Saturday, September 22, 2012

Celebration Give Away Time!


Canning Granny is growing... on Facebook, on the Blog, and as an Official Canbassador for the Washington State Fruit Commission... and we want to show our appreciation to you fantastic readers for your support.

1. Canning Granny on Facebook has reached and exceeded the 20,000 "Likes" and it's time for a give away!

2. We canned all that delicious fruit from the Washington State Fruit Commission and it's time for a give away!

3. The Canning Granny Blog has launched (and now worked all the kinks out of) a Forum for folks to share, chat, and discuss in a searchable format... and it's time for a give away!

It's a Triple Give Away Celebration!

Here's all you have to do to join in on the celebration and sign up to get a chance at the Triple Give Away!

First... go to the Canning Granny Blog (and if you're reading this, you're already here! ;-)

Next sign up for the Forum and Share a recipe with us... if you are hesitant or unsure of how to do this, I've tried to make it simple... Click on the "Forum" tab on the blogsite...


Next, click on "Register" (if you are already a registered member of the forum, you can skip this step and simply "Login") Once you are "Registered" or "Logged In"...


... Click on the SubForum "Sharing Recipes"...


Then click "New Topic"...


...You will then see a "Post New Message" area... Put the title of your recipe in the "Subject" box and type your recipe in the "Message" box... then click "Post Message"... that's all there is to it! Submit as many recipes as you like...


As soon as I wake up and get moving on Saturday, September 29... I will select randomly from the recipes submitted and announce THREE winners. I'll announce on the Forum as well as on Facebook...

I will count the entries first... then enter the number of entries on random.org... then choose THREE numbers... and match the winning number(s) to the entries...

Oh, I guess you would like to know what the give away will be, huh?

In celebration of Washington State Fruit and Canning Granny's Canbassadorship (I'm SURE that's a real word!)... a Trio of Canned Fruit... Winner ONE will receive a half pint of Nutty Plum Conserve, Winner TWO will receive a pint of Spirited Peaches, AND Winner THREE will win a pint of Nectarine Chutney... A Triple Give Away for a Triple Celebration!

And a big "Cyber-Hug" Thank YOU from me!

Pictured (l-r) Nectarine Chutney, Nutty Plum Conserve, and Spirited Peaches

Friday, September 21, 2012

Canning Nectarine Chutney


For my third Official Canbassador project, I made Nectarine Chutney using the beautiful big nectarines sent to me from the Washington State Fruit Commission. This chutney turned out SO good! Best way I can describe the taste is it tastes like a slightly sweet steak sauce... it's wonderful on pork (we ate some with pulled pork and it was yummy!) I'm sure it would go equally as nicely with chicken or beef, or any number of dishes, including the Ball recommended refried beans.


Here's what I did...
First I peeled, pitted and sliced 8 cups nectarines

I combined the sliced nectarines with 2 tsp. salt in my large stainless steel bowl and let it sit for 20 minutes.


Meanwhile, in my large, stainless steel saucepan, I mixed together...

2-1/2 cups lightly packed brown sugar


1-1/2 cups red wine vinegar


¼ cup Worcestershire sauce

I brought this mixture to a boil over medium high heat, stirring to dissolve the sugar. I stirred in the nectarines and returned the mixture to a boil, then reduced the heat and boiled gently, stirring frequently, until the nectarines were transparent, about 15 minutes.


I used a slotted spoon to remove the cooked nectarines from the saucepan and transferred them to a bowl, setting aside to add back in later.


To the mixture left in the saucepan, I added...1 cup finely chopped onions


¾ cup lime juice
2 cloves garlic, finely chopped
1 chili pepper (jalapeno, hot banana, etc.) finely chopped
2 Tbsp. chopped crystallized ginger
¼ tsp. ground cloves
¼ tsp. ground cinnamon


I brought this mixture to a boil over medium high heat, then reduced the heat and boiled gently, stirring occasionally, until the onions were tender, about 10 minutes.


I returned the nectarines to saucepan and boiled gently over medium heat, stirring frequently, until the mixture was thick enough to hold its shape on a spoon, about 20 minutes.

Meanwhile I prepared my canner, jars, and lids.


I ladled the hot chutney into hot, sterilized pint jars, leaving a ½ inch headspace. I removed any air bubbles and adjusted headspace, if necessary, by adding hot chutney.


I wiped the jar rims with a damp cloth and tightened my lids on to fingertip tightness.

I processed the jars in a boiling water bath for 15 minutes, ensuring they were completely covered with water. I brought them to a boil and processed for 15 minutes. After processing, I removed the jars from the canner and set them on a folded dish towel on the counter to cool... and to listen for the PING of each successfully sealed jar! LOVE the PING!


For a printable copy of this recipe, click here.

Friday, September 14, 2012

Canning Spirited Peaches

For my second canning project as Canbassador for the Washington State Fruit Commission, I chose to use my bounty of peaches to make Spirited Peaches... simple, elegant, and Oh so delicious!

Here's what I did...

I peeled, pitted and sliced my peaches (treat with Fruit Fresh or lemon juice to prevent browning)


For 7 cups of sliced peaches I mixed...

1 cup sugar
and
2 cups water

I brought this simple syrup mixture to a boil, stirring to dissolve the sugar, over medium high heat.

I then added the peaches to the syrup, brought the mixture back to a boil, lowered the heat and boiled gently for 5 minutes.

To each hot, sterilized pint jar, I added...

2 Tbsp. Brandy
1 Tbsp Peach Schnapps


Then, using a slotted spoon, I packed the sliced peaches into the jars within a generous half inch headspace. (Note: Next time, I'll add the peaches to the jar FIRST, then add the liquors... the method I used COULD have resulted in jar breakage... fortunately it didn't THIS time, thank goodness... hindsight is 20/20 you know!)


I then ladled hot syrup into the jars to cover the peaches, leaving a half inch headspace. I removed any air bubbles, then adjusted the headspace by adding more syrup if necessary.


I wiped the jar rims with a damp cloth, then tightened the lids on to fingertip tightness.

I processed the jars in a boiling water bath, ensuring they were completely covered with water. I brought the water to a boil and processed the jars for 20 minutes.

After processing, I removed the jars from the canner using my jar lifter, and set them on a folded dish towel on the counter to cool, and to listen for the PING! of each successfully sealed jar! Lovin' the PING!

There was about a cup of spirited peaches left over after filling all the jars... Mr. G and I shared them... Oh My Goodness!!! Delicious!!!!


For a printable copy of this recipe, click here.


Wednesday, September 12, 2012

Canning Nutty Plum Conserve - Suitable for any Canbassador Reception


 I recently was given the opportunity to serve as an Official Canbassador for the Washington State Fruit Commission... exciting! They contacted me via email and asked if I, as a canning blogger, would care to receive a box of Washington State fruit... they, in turn, asked if I would can it in any way I wished and then write about it in my blog. I was honored to do so. This is a part of a promotion to spread the word about delicious Washington fruit throughout the country. I was delighted to receive my box of fruit, containing nectarines, peaches, and plums, and searched for a special way to preserve this bounty.

The plums were used to create Nutty Plum Conserve... here's what I did...


I halved and pitted 5 pounds of plums


...and chopped 2 cups walnuts (pecans could be used, I had walnuts on hand)

Is this not the cutest little nut chopper!? It belonged to
Mr. G's mother and I am now proud to use it!
In a large, deep, stainless steel saucepan I combined the plums with

6-3/4 cups granulated sugar


4 cups raisins


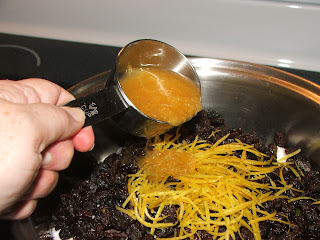
2 Tbsp. orange zest


1/2 cup freshly squeezed orange juice (the juice of one orange)


1/4 cup bottled lemon juice


I brought the mixture to a boil over medium-high heat, stirring constantly, then reduced the heat and boiled gently, stirring frequently, until the mixture thickened (about 35 minutes).


I then stirred in the 2 cups of chopped walnuts...


...and continued boiling gently for another 5 minutes. Then tested the mixture for gel.

To test for gel stage, you can do one of three things... 1) using a candy thermometer, cook soft spread until it reaches 220 degrees F. 2) The Sheet Test... dip a cold spoon into the mixture, lift it and hold horizontally so the syrup runs off the edge, it's ready when the syrup runs off in a sheet instead of drops. or 3) Chill a saucer in the freezer and place a teaspoonful of the syrup on the saucer and freeze for one minute. Remove from the freezer and push the mixture with your finger... if it is gelled, it will be set and the surface will will wrinkle when the edge is pushed. 


Once the mixture had reached gel stage, I began filling my hot, sterilized half pint jars, leaving a 1/4 inch headspace, removing air bubbles as necessary and adding more conserve as needed to adjust headspace. I wiped the jar rims with a damp cloth and tightened on my hot lids and bands to fingertip tightness.

I processed the jars of conserve in a boiling water bath, ensuring they were completely covered with water. I brought the water to a boil and processed for 10 minutes.

After processing, I waited 5 minutes, then removed the jars from the canner using my jar lifter and set them on a folded dish towel on the counter to cool... and to listen for the PING of each successfully sealed jar.

The recipe I used said it would make about 8 eight-ounce jars... I ended up with 10.

I took some jars of this soft spread to the ladies I work with... one of the ladies came in the next morning and told me she opened her jar to taste it... and "forget toast or a bagel! I ate about a fourth of the jar just with a spoon, it was so good!" I call that "success in canning!"


For a printable copy of this recipe click here.


Please feel free to check out the following websites and resources:

The Art of Canning - uga.edu
Culinary and Food Reception - ciachef.edu
Culinary Furniture and Reception Furniture - ucsd.edu
Reception Furniture - beyondtheofficedoor.com
Reception Furniture for Food Halls - maine.edu


For more information on the Washington State Fruit Commission go to www.sweetpreservation.com

Wednesday, September 5, 2012

Canning Pork N Beans


My garden is pretty much finished, still getting a little okra and peppers once in awhile, but nothing to can... so when I got the itch to can something recently, I headed towards my dry bean stock... Pork 'n' Beans!

Here's what I did...

I recently learned from a reader that there is an easier way to can beans than to soak overnight, cook part way and can... this is so easy and turns out so nicely, I'll never go back to the traditional way ever again!

For 8 pint jars of pork 'n' beans...

I used about 2 pounds (+ or -) of dried Navy beans...

In each hot, sterilized pint canning jar, I added

1/2 cup Navy beans (just dry, straight out of the bag! Well, actually, I DID rinse and sort through them)

I chopped two medium onions and divided them evenly among the 8 jars (something like 2-3 Tablespoons of onion per jar)

In a large stainless steel saucepan I mixed my sauce using...


2-15 oz. cans tomato sauce (you could use homemade)


1/4 cup brown sugar


3/4 teaspoons prepared yellow mustard


2 tablespoons molasses (you could use honey, corn syrup... or any other liquid sweetener)
3 cups water

I brought this mixture to a boil, stirring to make sure everything was dissolved.


I added one cup of the sauce to each pint jar of beans. At this point, 1/2 teaspoon of salt could be added to each jar, I chose to leave out the salt because I added, instead, a small piece of salt pork to each jar (fatback or bacon can be used)


Next I filled the remainder of each jar with boiling water, leaving a generous one inch headspace.

I wiped my jar rims with a damp cloth and tightened on my hot lids to fingertip tightness, then processed the jars in my pressure canner at 10 lbs. pressure for 75 minutes.

After processing, I allowed my canner to cool naturally and the pressure to drop to zero... then waited 10 more minutes before removing the weighted gauge and taking the lid off the canner.

Then I removed the jars from the canner using my jar lifter... setting them on a folded dish towel on the counter to cool and to listen for the PING of each successfully sealed jar. Yay!


Pork 'N' Beans! Great with so many things... an easy side dish for an easy quick meal!

For a printable copy of this recipe, click here.

Saturday, September 1, 2012

Canning Chicken Wing Sauce


 Down to the last tomatoes in the garden and I was looking for something yummy to make when I came across a recipe for Chicken Wing Sauce... Hmmm... sounded delicious and could be used for more than just wings... it would make a great baking sauce for chicken pieces. On with the project!

Here's what I did...

I chopped and cored

10 cups of tomatoes

and added...

2 cups chopped onion
1/3 cup lightly packed brown sugar
1/2 teaspoon cayenne pepper


 I brought the mixture to a boil over high heat, stirring constantly. Then reduced the heat and boiled gently, stirring occasionally for 30 minutes. I removed it from the heat and let it cool slightly, then put the mixture through a food mill to remove the seeds and peels.


I returned the pureed mixture to my stainless steel saucepan and added...


1-1/2 cups white vinegar
4 tsp. salt
2 cloves garlic, minced
1 tsp. ground allspice
1 tsp. ground cinnamon
1 tsp. ground cloves
1 tsp. ground ginger


I brought the mixture to a boil over high heat, then reduced the heat and boiled gently, stirring occasionally until the mixture was the consistency of a thin commercial sauce (it reduced by about half), about an hour.


I ladled the hot sauce into my hot sterilized pint jars, leaving a half inch headspace. I removed any air bubbles and adjusted the headspace if needed by adding more sauce. I wiped the rims with a damp cloth, then tightened the lids on to fingertip tightness.

I processed the jars in a boiling water bath, ensuring the jars were completely covered with water, brought the water to a boil and processed for 15 minutes.

After processing, I removed the jars from the canner using my jar lifter and set them on a folded dish towel on the counter to cool, and to listen for the PING! of each successfully sealed jar. Yummy!


The recipe I followed stated it would make 8-8 ounce jars... I canned it in pints and ended up with 5 pints.

For a printable copy of this recipe, click here.
html, body, div, span, applet, object, iframe, h1, h2, h3, h4, h5, h6, p, blockquote, pre, a, abbr, acronym, address, big, cite, code, del, dfn, em, font, img, ins, kbd, q, s, samp, small, strike, strong, sub, sup, tt, var, b, u, i, center, dl, dt, dd, ol, ul, li, fieldset, form, label, legend, table, caption, tbody, tfoot, thead, tr, th, td { margin: 0; padding: 0; border: 0; outline: 0; font-size: 100%; vertical-align: baseline; background: transparent; } body { line-height: 1; } ol, ul { list-style: none; } blockquote, q { quotes: none; } /* remember to define focus styles! */ :focus { outline: 0; } /* remember to highlight inserts somehow! */ ins { text-decoration: none; } del { text-decoration: line-through; } /* tables still need 'cellspacing="0"' in the markup */ table { border-collapse: collapse; border-spacing: 0; }