Sunday, September 25, 2011

Making and Canning Pectin from Apples


After making all the applesauce, apple butter, and canned apples from my plethora of apples, I decided to make pectin from all those peelings I had left over (it can be made from quartered whole apples, underripe apples, crabapples, or apple peelings, the greener the apple, the more pectin you can get). Apple pectin can be used in place of the store bought pectin when making jams and jellies... or alone to glaze fruit to add a shine. I like the idea of making my own... I know what's in it and I have it on hand whenever I need it... no running to the store at the last minute because I forgot the Sure-Jel!

Here's what I did...


I placed all those peelings (I had about 10-12 pounds) in a large stockpot. The recipe I found said to use 2 pounds of apples to 2 cups of water... I filled the pot with water to just cover the peelings and heated it all on medium-low heat, stirring occasionally until everything was fully cooked (mushy!)


I put a couple layers of cheesecloth in my big colander and strained the mixture.


Since I had so many peelings, I strained my mixture into a food grade bucket (use a bowl, saucepan, stockpot, or whatever you have that will hold the liquid). I covered it up and let it drip all the liquid out overnight (Tip: Don't press the mixture, just let it drip, or the pectin will be cloudy)


I poured the strained liquid into a large saucepan and heated it up. Once it was heated, I tested it for "pectin strength."


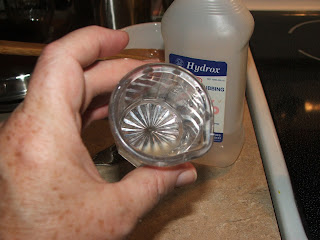
I added a few drops of the liquid (cooled) to a small amount of rubbing alcohol to test the strength.


First time, the apple liquid just mixed right in with the alcohol...

So I cooked it down, boiling gently, and testing it about every half hour (I dipped a small amount out and put it in the fridge to cool then tested it)

The pectin should coagulate into a jelly-like mass when added to the alcohol... if it can be picked up with a fork it's concentrated enough, if not, it's too weak and you continue boiling it down to increase the concentration.

Yes, I know what it LOOKS like, but it's what I was going for!
Finally, after 3 or 4 "tests" I got coagulation!!!! Success!

I poured my pectin into hot, half-pint canning jars and tightened hot lids and rings on, then processed them in a boiling water bath for ten minutes (put jars in canner ensuring they are covered with water, bring to a boil and process), then removed them with my jar lifter and set them on a folded dish towel on the counter to cool, and to listen for the PING of each successfully sealed jar.


To use in jelly making... 
  • Use 4-6 Tablespoons of homemade pectin for every ONE cup of prepared juice. 
  • Use equal amounts of juice+pectin and sugar to make jelly.
  • Place juice+pectin and sugar in a large saucepan and place over medium-high heat.
  • Stir constantly to keep it from burning to the bottom of the pan
  • After jelly comes to a full, rolling boil, let it do so for about a minute.
  • To test, dip a large spoon into jelly mixture then hold it over the pan sideways.
  • If the jelly falls off the spoon in a sheet rather than a drop, it is ready.
*Note: Adding homemade pectin to fruits which are low in pectin will not affect the flavor of the original fruit and will help bring the fruit mixture to a "soft-set" without excessive cooking.


Canning Granny©2011 All Rights Reserved


Thursday, September 22, 2011

Canning Apples in Cinnamon Syrup - A Welcome Announcement at Any Occasion


What's the perfect smell and flavor combinations of fall? For me it's apples and cinnamon... simple and simply WONDERFUL! Apples in Syrup... with cinnamon added... the ultimate flavor combo for making into cobblers or pies... or just baking and eating.

Here's what I did...


I peeled 10-12 pounds of apples, cored them, and sliced them into eighths, treating them with Fruit Fresh as I went along to prevent them from browning.


I prepared a batch of hot syrup by combining 4 cups of sugar


With 4 cups of water


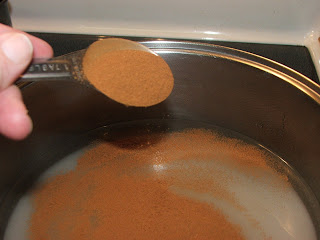
And one tablespoon of cinnamon


In my big stainless steel stockpot, I combined the apples with the cinnamon syrup (I used a syrup using a 1:1 ratio, if you like your syrup lighter, use 1/2 cup sugar to 5 cups water for ultra light syrup, 1-1/4 cups sugar to 5-1/2 cups water for extra light, 2-1/4 cups sugar to 5-1/4 cups water for light, or 3-1/4 cups sugar to 5 cups water for medium syrup).

I brought my apples and syrup to a boil over medium-high heat, then reduced the heat to medium-low and boiled them gently for about 5 minutes, until heated through.


Meanwhile, I prepared my pint canning jars by placing them in a flat pan of boiling water set on two stove eyes and kept them hot until I was ready for them.


I simmered my lids in hot water and kept them hot until I was ready for them.


When my apples and syrup were heated through, I packed my hot apples into the hot jars to within a generous half inch of the top of the jar. Then I ladled hot syrup into the jars to cover the apples. I removed air bubbles and adjusted the headspace when needed by adding more hot syrup.


I wiped the rims, then tightened the lids and rings on to fingertip tightness. I placed the filled jars into my canner, ensuring they were completely covered with water. I brought the water to a boil and processed the jars for 20 minutes. After processing, I removed the jars from the canner using my jar lifter and set them on a folded dish towel on the counter to cool, and to listen for the PING of each successfully sealed jar.

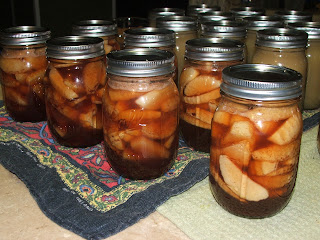
Apples in Cinnamon Syrup! Yum!

If you receive graduation announcements or invitations to graduation parties, using the apples you have been canned in cinnamon syrup to make delicious apple crisp or another dessert such as apple pie would be an excellent dish to bring. At graduation parties and other family functions some of the best memories come from sharing home cooked meals and desserts with your loved ones. Hearing the graduation announcements of your loved ones is always great news, so why not make it that much more special by preparing a dish such as this.


Saturday, September 17, 2011

Canning Applesauce

My great Grandma Allison is the lady in the center holding my second cousin Melanie.
My Nanny Sensing (left) is holding me and the lovely lady on the right is my great aunt Macie holding my
second cousin Sonja.

One of my favorite "applesauce" memories is the fried pies my great grandmother, Grandma Allison (Minnie Belle Johnson Allison) made... she would spice up some applesauce with cinnamon, nutmeg, and cloves... mix up some pie crust dough and fry them in a cast iron skillet...Oh my... melt in your mouth goodness! Every family gathering, Grandma was requested (or perhaps demanded!) to bring her fried pies. I was fortunate to know my sweet little great grandma (she lived a long life and I was in my early 20s when she passed away). Grandma was a strong, amazing woman. I never knew Papa, my great grandfather, he passed away before my Mama was born and Grandma never remarried, living alone for many many years in the little cabin where she and Papa had raised their children. For a lot of years, she cut her own firewood, raised chickens, cooked on a wood cookstove, and worked her garden... once she finally slowed down a bit (probably in her 80s), the family tore down her little cabin and bought her a new mobile home where she contentedly spent the rest of her life. I loved that tiny, tough little woman dearly. Grandma came to stay with my brother, Jeff, and me when Mama was in the hospital having our little brother, Kevin. Our little blue tricycle got to missing and Grandma, holding my four-year-old hand and carrying two-year-old Jeff, scoured the neighborhood until she found our trike (Daddy had written our names on the metal seat, so we knew it was ours). She firmly requested the little bully to remove himself from our property (his older brother, hearing the firmness in her voice told him he'd better get off!), she retrieved our blue tricycle, and all was right in our toddler world again. She always wore her silver hair in a bun on the back of her head... one time when I was maybe 8 or 9 years old, Grandma spent the night with us and had to sleep in my room with me. It was the first time I had ever seen her hair down, when she took the long hair down and brushed it out getting ready for bed... I remember being mesmerized with her beautiful, thick, long, silver hair.

I thought about Grandma Allison as I made applesauce recently, wishing I had paid better attention when watching her make those famous fried pies so I could reproduce them... I guess they'll have to remain a beloved memory.

Here's what I did...


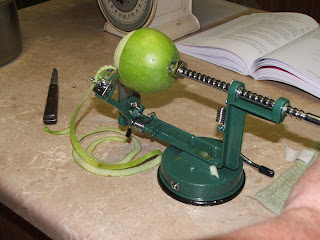
I peeled and sliced 12 pounds of apples. LOVE my apple peeler/corer/slicer... it made short work of all those apples! 


I sprinkled Fruit Fresh on the apples as I went along to prevent browning.


In a large stainless steel saucepan, I combined the apples with just enough water to prevent sticking. I brought them to a boil over medium-high heat. I reduced the heat and boiled gently, stirring occasionally until the apples were tender (this took about 20-30 minutes). I removed the apples from the heat...


...and, working in batches, transferred the apples to a food mill, pureeing until smooth (you could use a food processor for this step) I milled all of my apples because I was going for a smooth sauce... if you like your applesauce chunky, coarsely crush some of the apples, and puree the rest.


I returned the pureed apples to a saucepan and added 3 cups of sugar.


... and 4 Tablespoons of lemon juice.


I brought the mixture to a boil over medium-high heat, stirring frequently to prevent sticking.


I sterilized my pint canning jars in a flat pan of water set on two stove eyes.


I heated my lids and kept them hot until I was ready to use them.


I ladled the hot applesauce into the hot jars, leaving a half inch headspace.


I removed any air bubbles and adjusted the headspace, when necessary by adding more applesauce.


I wiped the jar rims...


...and, using my magnetic lid wand, removed them from the hot water and screwed the lids on to fingertip tightness.


I placed the jars in the canner, making sure they were completely covered with water, brought the water to a boil and processed the pint jars in the boiling water bath for 20 minutes.

I removed the jars from the canner after processing and set them on a folded dish towel on the counter to cool and to listen for the PING of each successfully sealed jar.

Finished applesauce!

I may not be able to reproduce Grandma Allison's fried apple pies... but with some of the sliced apples, I sure was able to make a mean apple crisp (yummy with vanilla bean ice cream!)


Tuesday, September 13, 2011

Canning Apple Butter

Apples... Granny Smiths and Winesaps

Apples and cinnamon... one of my favorite fall scent combinations! And what better way to capture that scent (and flavor) than good old fashioned apple butter! I began my early September Saturday morning making apple butter... here's what I did...

I cored and sliced 12 pounds of apples... I mixed half and half Granny Smith apples and Winesaps.


In a large stainless steel saucepan, I combined my sliced apples with 4 cups of apple juice (the original recipe I was following called for apple cider, but I had the juice on hand and used the juice... water would be fine as well... the juice just adds another layer of flavor to the finished butter)

I brought my apple and juice mixture to a boil over medium-high heat, then reduced the heat and boiled gently, stirring occasionally, until the apples were soft... took about 30 minutes.


Once the apples were soft, I worked in batches and transferred the mixture to a food mill, pureeing until I had a uniform apple mixture. (a food processor can be used for this step, but you would need to peel the apples before cooking)


I measured 24 cups of apple puree into a clean stainless steel saucepan...


 and added 6 cups of granulated sugar...


A tablespoon of cinnamon...


...and a teaspoon of ground cloves.


I stirred until the sugar dissolved, then brought the mixture to a boil over medium-high heat, stirring frequently. I reduced the heat and boiled gently, stirring frequently until the mixture thickened and held its shape.

Fruit butters are cooked until they thicken and begin to hold their shape on a spoon. To assess doneness, spoon a small quantity of cooked mixture onto a chilled plate. When liquid does not separate, creating a rim around the edge, and the mixture holds a buttery, spreadable shape, the butter is ready to ladle into jars and process.


While the apple butter was cooking, I prepared my pint canning jars by heating them in boiling water in a flat pan set on two stove eyes.


I heated my lids and rings in boiling water and kept both the lids and jars hot until I was ready to use them.


I ladled the hot apple butter into the hot jars, leaving 1/4 inch headspace.


I removed air bubbles and adjusted headspace as needed by added more hot apple butter. I removed the lids from the hot water using my handy magnetic wand gadget.


I tightened the lids onto the jars to fingertip tightness, placed the filled jars into my canner, ensuring they were completely covered with water. I brought them to a boil and processed them in the boiling water bath for 10 minutes.


I removed the jars from the canner using my jar lifter and placed them on a folded dish towel on the counter to cool... and to listen for the PING of each successfully sealed jar (LOVE that sound!)


My DH's favorite breakfast includes scrambled eggs, bacon, and raisin toast spread with apple butter... so for Sunday brunch I made a fresh hot loaf of cinnamon raisin bread and whipped up his favorite breakfast with the delicious, cinnamon-y apple butter... Deee-Lish!!! He loved it... and I love him!


Canning Granny©2011 All Rights Reserved


html, body, div, span, applet, object, iframe, h1, h2, h3, h4, h5, h6, p, blockquote, pre, a, abbr, acronym, address, big, cite, code, del, dfn, em, font, img, ins, kbd, q, s, samp, small, strike, strong, sub, sup, tt, var, b, u, i, center, dl, dt, dd, ol, ul, li, fieldset, form, label, legend, table, caption, tbody, tfoot, thead, tr, th, td { margin: 0; padding: 0; border: 0; outline: 0; font-size: 100%; vertical-align: baseline; background: transparent; } body { line-height: 1; } ol, ul { list-style: none; } blockquote, q { quotes: none; } /* remember to define focus styles! */ :focus { outline: 0; } /* remember to highlight inserts somehow! */ ins { text-decoration: none; } del { text-decoration: line-through; } /* tables still need 'cellspacing="0"' in the markup */ table { border-collapse: collapse; border-spacing: 0; }